Using WishList Member to Sell Your WP Courseware Courses

The History of WishList Member and WP Courseware
There are a lot of great membership plugins out there for WordPress. Each has its own unique features which set it apart from others and we do our best to continually develop WP Courseware integrations for as many of them as possible so that our users have options for expanding their online course offerings to fit their business model.
But WishList Member, in particular, is a bit special for us because we have a long history with it. And it was the first membership plugin for which we developed a WP Courseware integration to link courses and membership levels.
Why?
Well, before Nate and I launched Fly Plugins we were both involved in a separate business together. We had met through a private coaching and mastermind group to extend some of our skills as online entrepreneurs. The two of us hit it off and began having conversations outside of the online group, exchanging ideas and realizing that more often than not we had similar concepts for businesses in mind and also that we had complimentary professional backgrounds which would work very well together.
We eventually settled on combining our skills to begin teaching online courses. We recorded hundreds of hours of video content and moved forward with building our site out to deliver that content. And we chose WishList Member as our membership plugin as we felt it was the best fir for us at the time.
But as we structured our training content using every feature WordPress and existing plugins had to offer, we ran across a not-so-small problem...
What Was the Issue We Faced?
Well, no matter how far and wide we searched, there was no WordPress plugin to structure and deliver courses. After hundreds of Google queries...nada!
Sure there were "learning management system" hosted platforms, but we needed a way to structure the content we already had in WordPress. After countless hours of customizing our content hierarchy structures, we still kept realizing that we needed more and more functionality to present content in a way which optimized the learning experience of our students. What about quizzes? What about progress tracking? What about offering certificates?
Surely there had to be something out there to help, but there simply wasn't.
No LMS? No Problem!
Nate and I didn't let this minor issue hold us back. (Ok, looking back it was a somewhat major problem since the plugin we ended up developing turned out to be something that thousands of other WordPress users needed as well.)
Fast forward a few years and WP Courseware is now installed on tens of thousands of training sites around the globe.
And the course we initially started with? Well, the content was great but we quickly realized we had something far bigger on our hands and that we had an opportunity to help many other entrepreneurs who were in the position we'd been in a few months earlier, so we had to shift our focus to creating and extending the best possible training plugin for WordPress that we could offer.
Why this Membership Plugin?
Simply put, we chose this membership plugin because it is stacked with features. You can protect anything and everything with in WordPress.
However, one thing I really admire about WishList is that it is a complete solution for internet marketers and entrepreneurs. It has integration with all major payment gateways as well as many email auto responder services. Basically, you have a full on platform to sell and communicate with customers and market to potential customers. And if they don't have a payment gateway integration you're looking for, you can drop in code for your own.
Let's Get Started with Integrating WishList Member and WP Courseware!
First, we will need to ensure we have the latest version of WordPress as well as the following WordPress plugins installed and activated.
- Latest version of WordPress (free)
- WP Courseware
- WishList Member
- WishList Member addon for WP Courseware (free)
Setup Wizard
I don't know about you, but I love setup wizards. They make it so easy to get things up and running quickly. This membership plugin has conveniently added a setup wizard which will assist in just a few easy steps. For this tutorial, we will utilize the wizard. Obviously, you can always go back and modify anything that you initially configured through the wizard.
- Click on WishList Member→Dashboard.
- Since this is the first time that you attempt to access the dashboard, you will be presented with an option to use the wizard. Click Yes.
- The first step of the wizard is to create one or more membership levels. For now you don't have to spend a ton of time thinking of creative membership level names because you can always come back later and adjust them as desired. Click Next.
- The next step is to create error pages. Chances are you've not created these pages yet, so you can simply leave the radio button set to Create it for me. Click Next. Again, you can always go back and change or adjust these later.
- In step 3 of the wizard, you can set your protection settings. Depending on what your goal is with your membership site, you can select the option that fits your situation best. There is a thorough description of what each setting does on the right hand side. Once complete, click Next.
- In the last step you can create your redirect pages. Basically these will be the pages that users are directed to upon registration and login. The login redirect will be important in a later step, however, for now you can set both to Create it for me.
- Click Save settings.
That's it! Sweet!

Create Your First Course with WP Courseware
If you aren't quite ready to create your first course, you can setup a basic barebones course just for testing purposes. Courses are pretty simple as they consist of modules and units (modules being like chapters in a book). I will walk you through the basic setup, but for a more detailed explanation feel free to checkout our YouTube playlist that walks you step-by-step through each option in greater detail.
- Click Training Courses→Add a Course.
- Enter a name for your course and then enter a description. Click Save All Details.
- Click Training Courses→Add Module.
- Type in a title for the module.
- From the drop down select the course you want to associate the module with.
- Type in a description for your course and click Save All Details.
- Click Course Units→Add New.
- Type in a title for the unit and type in some content and click publish. Again, if you don't have content at this point, just type in some random characters or words.
- You have just created a barebones course. Now click Training Courses, then find your course in the list, and click on the Module, Units and Quiz Ordering button just off to the right hand side.
- Click and drag the unit from the unassigned units area into the module area created back in step 3.
That's pretty much it for creating a barebones course.
One Question We Are Frequently Asked Is...
Do I need to protect individual course units with WishList Member?
The quick answer to that is, no. The reason for this is that a user must be registered, logged in, and enrolled into a course in order to view course content. Although, we've had some customers who insist on protecting individual units, which is possible. In order to do so, we will need to configure this membership plugin to acknowledge the course unit custom post type.
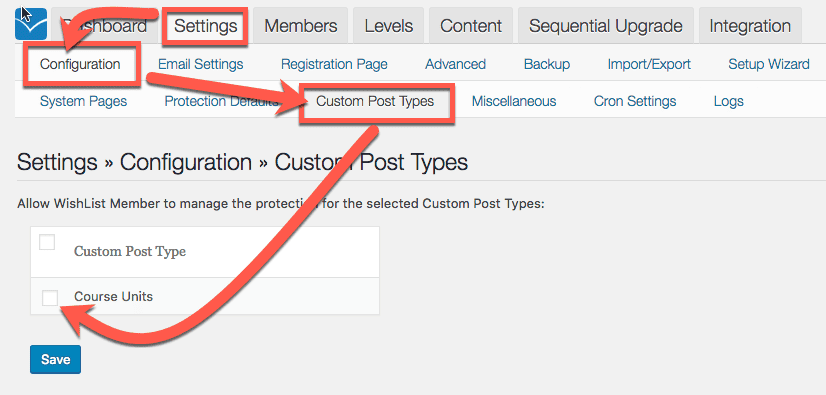
- Click Settings→Configuration→Custom Post Types.
- Select the Course Units check box and click Save.
Integrate WP Courseware and WishList Member
This is the step which associates one or more WP Courseware courses to a membership level. Then when someone purchases a membership level, they are automatically enrolled into the course(s) associated with that level.
- Click Training Courses→WishList Member.
- Find the level ID in the list and click the Edit Course Access Settings button.
- Next, select your course or courses that you want to associate with the membership level.
- Click Save Changes.

Create a Course Outline for Your Students
Creating a course outline is super important because this serves as a course guide as well as a navigational page for your course. Setting up a course outline will require you to add one of two shortcodes to your course outline page. Each shortcode has slightly different functionality and choosing one will be dependent on how you will be structuring your course(s).
If you have multiple courses, I would recommend using the dynamic outline or what we refer to as the “course progress” page. The course progress page will dynamically detect all the courses that your students are enrolled in and display a course outline for those courses on the page. One caveat to remember is that the user must be logged in to see the course progress outline(s).
The other shortcode will simply display a single course outline based on the course ID parameter specified in the shortcode. The student doesn't need to be logged in to view the course outline, however, the student will need to be logged in to have the ability to click on the hyperlinks that link to the course units.
We will create a course progress page for this tutorial:
- Click Pages→Add New.
- Type in a page title like My Courses.
- Insert the [wpcourse_progress] shortcode for the course progress page. For additional shortcode attributes, see the WP Courseware documentation page by clicking Training Courses→Documentation.
- If your theme supports full width pages, I would recommend using full width for the course outline page, but it isn't necessary.
- Click Publish.
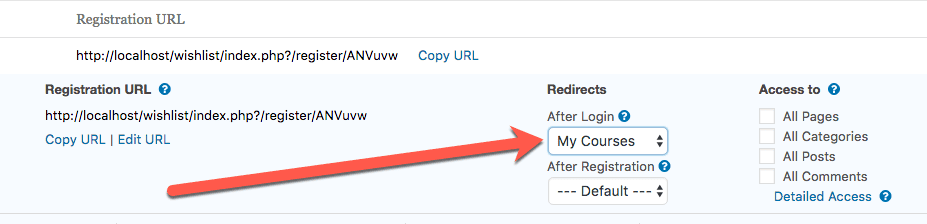
One important step to perform here is to setup the redirect so that when members log in, they will be automatically redirected to the course progress page.
- Click on WishList Member→Levels.
- Find the level in the list that you've associated with a course and click on the level name.
- Click the Redirect drop down menu for After Login. Select the course progress page in the list.
- Click Save.
Be sure to set this for all of your membership levels because it will be important to provide your students with an entry point to your course(s).
Take WishList Member for a Test Drive
We've got the foundation for your membership site with an online course. At this point we can actually test to see if our integration works as expected. The cool thing about this membership plugin is that you don't have to set up a payment gateway to test if the integration works. Here's how to test:
- Click on WishList Member→Levels.
- Find the level in the list that you've associated with a course and click Copy URL.
- Open a separate browser and paste the link into the address box and hit enter.
- Fill out the registration form and click Submit Registration.
- You will then be redirected to the registration complete page and then automatically logged in.
- Switch back over to the other browser where you have the WordPress admin panel already open. Click on the Users page and find the newly registered user in the list. If you see a progress bar next to the user, then the integration worked because that indicates they are enrolled into a course. Great job!
[IMPORTANT NOTE] - In step #2 above, we used a URL that directly registers a user to a membership level, however please don't share that URL with the public or use it on a buy now button or on your sales page. When you setup your payment gateway you will have a very different URL that you can use on your sales page.

Final Steps
There are just a couple items left that we will need to wrap up to have a fully functional membership site ready to sell courses. Since there are so many options for payment gateways, I will quickly walk you through setting up a PayPal Standard gateway. Obviously, you will need to set up a sales page but I will show you which product link is proper to post on your sales page.
First, let's set up the PayPal standard payment gateway.
- Click on WishList Member→Integrations.
- Select the PayPal Payments Standard checkbox and click Update Shopping Carts.
- Enter your PayPal Email details as well as the PDT Identity Token. The PayPal PDT Identity Token is located in your PayPal account on the My Account→My Selling Tools→Website Preferences section of PayPal.
- Next, configure the Cancelation Settings.
- Click Save Settings. Upon doing so, you will see a new section just below called Setup Products.
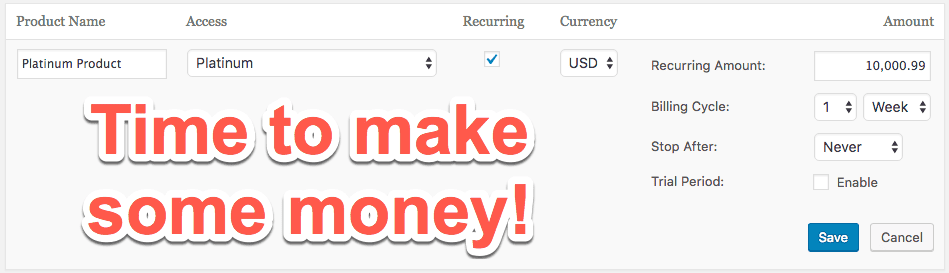
- From the drop-down menu, select your membership level and then click Add Product.
- Enter your product's price and determine if it will be a recurring subscription. If so, there will be additional details to configure.
- Click Save.
- Upon saving, you will see a small link icon. If you click on it, a URL will appear on screen. This is the URL you will be using on your sales page for a buy now button.
That's it! You could technically launch your membership site and sell your courses at this point. Obviously, you may need to create additional course content or additional courses, or perhaps additional membership levels. If you are having trouble gathering thoughts to create course content or membership content, you can use a mind mapping tool to plan out your content like Nate wrote about in last week's blog post.
You read my mind! The missing component is the Course Outline or what I’m calling the Class Directory page. One more step down before launch! Thank you!!!
I have a bit of a soft spot for Wishlist Member too. It was one of the first premium plugins that I ever bought and opened so many possibilities with WordPress. Agreed that I didn’t find any great courseware plugins back then either! This was before custom post types became such a big thing and I used to create hundreds of standard pages when building a membership site and manually configure each one. Having something like WP Courseware back then would have saved me a lot of time and would have made it a lot easier to manage too!
I have been using the combination of WP Courseware and WishList Member for sometime and they go well together; I would like to see changes in both, yet overall it does the job well for having a Learning Management System (LMS) on a website.
Thank you Lionel! Keep your eyes peeled over the next several months. We have some exciting things in store for WP Courseware and S3 Media Maestro!
I was thinking about this. How does this work when I’m running multiple courses on my website?
Let’s say I offer 5 courses. Some of my students are enrolled in just one course others in multiple, but not all in the same. Would I need different membership levels for each possible course combination? Or would each course be associated with a different membership and would students acquire multiple memberships?
Hi Remco,
Great question. Yes, membership is based on enrollment. An easy way to think of this is each course is a “membership level”.