
Paid Memberships Pro for Selling Courses
A couple weeks ago I published an article on how to sell courses using Easy Digital Downloads. But what if you would like to add a membership element to your website?
Whats the difference?
Easy Digital Downloads allows you to sell courses as “products”. A membership plugin allows you to use your website as the “product”. In other words, you can create premium content within your website that you’d like to sell. For example, lets say you created a series of epic posts and would like to sell access to the series…you’d then need a membership plugin. Typically, membership type sites use a subscription based pricing model which allows them to generate recurring income. And, yes, that’s also a great thing!
For example, let’s say you’re a day trader. Every day when the stock market closes, perhaps you publish the strategies you used for the day or roundups of some of your “end of day trading signals”. This type of content is premium content which you can set up behind a membership wall so that only paying members can view it.
Then you can take it a step further and create different levels and charge more for the premium levels. Obviously, you’d need to provide additional content for added value within the premium level.
Yes, people will pay for premium content!
Now let’s presume that you want to create premium content that people want to pay for, but you also want to provide a formal instructional course that complements all the tips, tricks, and strategies that you provide behind the membership wall.
This is actually how Nate and I got our start with WP Courseware. We had a website with premium content, however, we needed a method to deliver our high-value, step-by-step video training course. At that time there wasn’t a learning management system plugin for WordPress to help us deliver our course. We ended up creating a fancy dashboard and did some tricky things with our menu to achieve a similar result, but we discovered that a full-featured LMS would have been super helpful, hence our idea for WP Courseware.
As the title of this blog post suggests, I will show you how to sell courses with Paid Memberships Pro and WP Courseware so that you can easily sell courses and provide premium content. Just as a side note, we integrate with many membership and eCommerce plugins. Here is a complete list of WP Courseware integrations.
Paid Memberships Pro is not only free but it’s super easy to setup. As you will see in the tutorial, you basically need to install PMP, set up a membership level, configure the payment gateway, and off you go to sell courses.
One thing to keep in mind with Paid Memberships Pro is that your members can only be members of a single membership level at one time. They can change membership levels but they can only be associated with a single level at any given time.
The Prerequisites for Selling Courses with Paid Memberships Pro
Be sure that you have the following installed, activated, and ready to go.
- Latest version of WordPress (free)
- Responsive Pricing Table by WP Darko (free & optional)
- WP Courseware
- Paid Memberships Pro by Jason Coleman (free)
- Paid Memberships Pro addon for WP Courseware (free)
You will notice I added in a pricing table plugin. Paid Memberships Pro does provide a “levels page” shortcode which is the equivalent of setting up a sales page. However, it’s pretty basic and doesn’t allow you to display the description of the level. You can upgrade to PMPro Plus which will give you some really great features like the “Advanced Levels Page Shortcode” which can make the levels page much more intuitive allowing you to display the description.
For the purpose of this tutorial, I decided to go with a free plugin to create a basic pricing table that you can add to your sales page.
Okay…lets get down to business!
Start by setting up the payment gateway
- First click Memberships→Payment Settings.
- Select Test Payment in the drop down next to Payment Gateway.
- Next select Sandbox/Testing for the Gateway Environment.
- Go ahead and set your currency.
- Select the Accepted Credit Card Types that you will be accepting.
- Click Save Settings.

Configure the email notifications
- First click Memberships→Email.
- Insert your From Email and From Name fields.
- The checkbox next to Only Filter PMPro Emails, however it is optional. Basically if you check the box, the two fields you configured above will apply only to emails triggered by Paid Memberships Pro.
- Next select the Admin Emails that you’d like to receive.
- The very last checkbox should remain deselected because your members will receive an email from Paid Memberships Pro, and you don’t want to flood them with an unnecessary email.
- Click Save Settings.
Configure all the miscellaneous stuff
If you click on the Memberships→Advanced Settings menu item, you can configure things like:
- Onscreen notifications for users depending on their logged in status as well as RSS Feed notifications for non-members.
- Hide or show excerpts for non-members.
- Setup re-CAPTCHA.
- Setup a terms of service page and require members to agree.
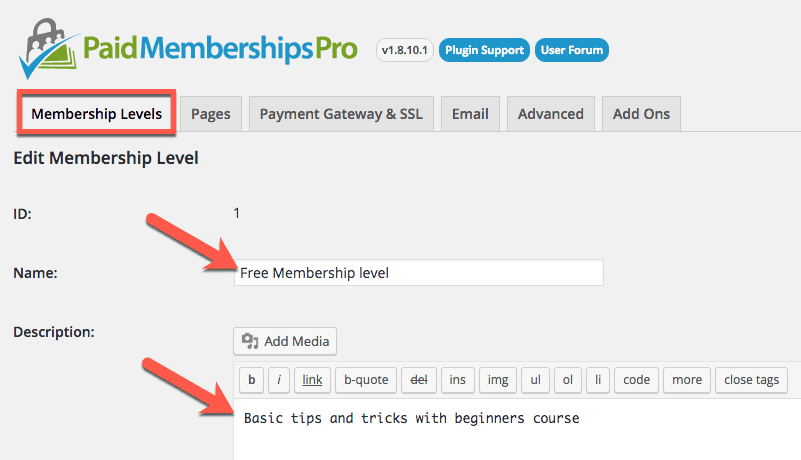
Create Paid Memberships Pro membership levels
- Click Memberships→Membership Levels.
- Click Add New Level.
- Give your membership level a name. Some examples of level names are Bronze, Silver, and Platinum.
- Insert a description of the membership level.
- In the billing details area, configure your Initial Price. If the level is free, simply leave set to 0.00.
- If your level will be a recurring payment, select the Recurring Subscription checkbox. Then you can configure the amount to be billed per billing cycle. You can also setup a trial period for the membership level.
- Lastly you can setup a Membership Expiration.
- Click Save Level.
Set up the Paid Membership Pro pricing tables
This section is optional. If you decided to use the Responsive Pricing Table, then follow these steps.
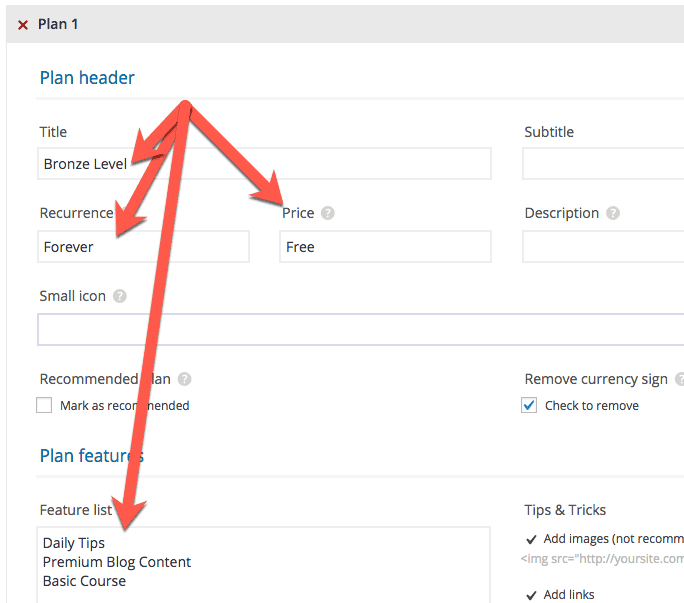
- Click Pricing Tables→Add New. This will create a new pricing table in which you can add various plans which will coincide with your membership levels.
- Fill out the Plan Header information. I recommend including the title (same name as the membership level), recurrence, and price.
- Next fill in the Feature List. Be sure to only add one feature per line. You can add images (not recommended), links using the anchor tag, bold text using the strong tag and “-n” to show a feature that’s not included.
- Lastly, you will need to configure the plan button. First add the button text. For example you could use “Buy Now” or “Sign Up”. Then insert the link which you want the button to be redirected. Since we will be using Paid Memberships Pro to checkout, you will want to redirect the user to the membership level that is associated with that plan. For example if you are associating this plan with level 1, your URL would look like this “http://your-domain.com/membership-account/membership-checkout/?level=1.”
- Optionally you can configure the color of the plan button by clicking on Select Color, and picking the color of your choice.
- Rinse and repeat steps 1 – 5 for each membership level. I believe the recommendation is not to add more than 5 plans as the pricing tables will not display correctly. Also remember to change the level ID in the URL in step 4.
- Once you have all plans setup click Publish.
- Click Pricing Tables→All Pricing Tables and find your pricing table. Copy the shortcode to your clipboard.
- Next, navigate to edit the page you’d like to place your pricing tables and paste the shortcode from the step above.
Now let’s create a course…
There are only a few components that make up a course. A module, a unit, and the optional quiz make up a course. Let’s create a basic course. By the way, we have a YouTube playlist that takes you step by step in creating a course.
- Click Training Courses→Add a Course
- Type in a name for your course as well as a description and click Save All Details.
- Click Training Courses→Add Module.
- Enter a title for the module.
- From the drop down select the associated course.
- Type in a description and click Save All Details.
- Next, click Course Units→Add New.
- Give the unit a title and enter the unit content and click publish.
- Now that we have all our components required for a course, we need to put it together. Click Training Courses, then find your course in the list. Click on the Module, Units and Quiz Ordering button.
- Click and drag the newly created unit into the module created in step 3.
Here are a few extras that you can configure within your course that were not mentioned in the steps above.
- Admin notification email address
- User notification messages
- Email templates
- Enable certificates
- Add course prerequisites
Provide an entry point for your course
The best way to add an entry point for your course is by creating a course outline. This course progress page also acts as a “dashboard” for the course so students can view course progress, grades and download certificates.
Let’s create a course progress page which is the “dynamic course outline”.
- Click Pages→Add New.
- Give your page a title. For example, My Courses, might be an ideal title.
- Insert a shortcode for the course progress page. [wpcourse_progress]. For additional shortcode attributes see the documentation page located by clicking Training Courses→Documentation.
- If your theme has a template for full width, I would recommend using it for the course outline page.
- Click Publish.
Associate your course to the Paid Memberships Pro membership level
This is where the magic happens! Basically we are going to associate a course or multiple courses (if you have multiple courses) with your download product. Then when someone purchases your product, they will automatically be enrolled into your course(s).
- Click Training Courses→Paid Memberships Pro.
- Find your level ID in the list and click Edit Course Access Settings.
- Select your course or courses that you want to associate with the membership level.
- Click Save Changes.

Time to test
- Navigate to the page which you placed the price table.
- Select one of the membership levels by clicking the “buy button”.
- On the Membership Checkout page click Submit and Confirm. You should now be a member of that level and enrolled into it’s associated course.
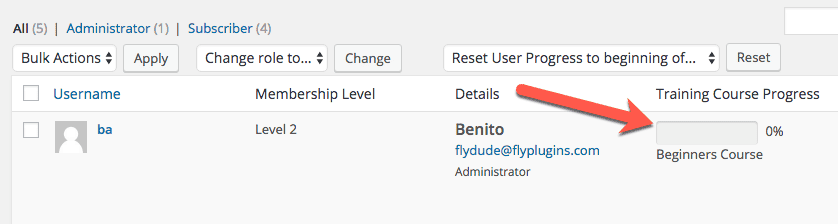
- Next, we need to confirm that we were enrolled into the associated course. Navigate back to the WordPress admin panel.
- Click on Users.
- Find the user that subscribed to the membership level and confirm they are enrolled into the correct course(s).
Time to go live!
- First click Memberships→Payment Settings.
- Select the payment gateway you will be using in the drop down next to Payment Gateway.
- Next select Live/Production for the Gateway Environment.
- Configure your payment gateway.
- Configure the Sales Tax if it applies.
- If your site is using an SSL, you can configure the SSL Settings area.
- Click Save Settings.
You are now ready to sell courses with your membership site. However, don’t forget to study up on how to market your course. Nate just wrote a great article with several tips on marketing your course.
What membership plugins are you using? Let us know in the comments below.
1 Comment
Leave a Comment
Would you like to test drive WP Courseware for Free?
No credit card required
You saved my time long time looking for solution today I got , thanks